
The ‘Quick User Manual’ provided with the hob(s) is for quick reference. Here you will find the full user manuals for Millar Gas Hobs available in different languages. Millar Int’l LTD reserves the right to update the full user manual at any time. The manuals here will always supersede any previous manuals for correct usage, care and maintenance, health and safety, and installation.
English Manual click to download
Manuel en français cliquez sur télécharger
Manuale italiano clicca scarica
Glass is a brittle material even when treated to be toughened, care should be taken to make sure that the correct parameters for installation have been followed regarding the cutout size and the supports fitted correctly (if the cutout size is too small, too large or the hob is incorrectly supported, it will change the parameters the glass was designed to with stand). Also, make sure that objects (Blunt or pointed) do not knock or strike the glass. These things can cause strain on the glass or micro scars which will result in the glass eventually exploding.
It is recommended any spills on the glass be cleaned straight away especially if they are sticky high sugar content spills, these will be harder to clean if left to cool.
The glass can be washed after use with warm mildly soapy water on a damp cloth, then dry off the glass. After the glass is dry, if needed use a magic sponge (one was provided with the product) to remove any surface marks still present. If the glass still appears to have a film on it after, the detergent being used will be incorrect.
If spills which have been left on the glass are hard to remove with the above tip, you can use a blunt scraper (see the user manual for illustration)
Never wash the cast iron pan support in the dishwasher, they are not dishwasher safe and this will lead to rusting
The best way to clean the pan supports is to soak them in warm water with laundry washing powder (it does not contain harsh chemicals that some washing-up liquids do). You can add some baking soda if the powder does not contain it. Once soaked you can clean the pan supports with a scourer. Once they dry, please apply cooking oil on their surface to season them and bake for 30 minutes in the oven at a temperature of 180 degrees. Seasoning will keep the pan supports shiny. Once they have baked for 30 mins, allow the pan supports to cool down naturally in the turned off oven
If the burner is not igniting, but gas is coming from the burner.
Make sure around the ignitor and the thermal coupling safety device are cleaned of debris build up
The burner is correctly assembled, the Alloy flame spreader is set correctly, and the correct burner caps are on the correct burner (Only the Wok burner cap has a domed shape to it all the others are flat)
The Alloy flame spread is cleaned and there is no debris in the holes especially around near the ignitor
The is no debris in the inject nozzle (When the hob is NOT in use, a pin can be pushed into the injector hole to remove debris)
Correct usage of how to ignite the burner is being followed (Refer to the user manual)
If you have followed these steps and the burner still does not ignite, Contact customer services on info@millargb.com providing the information asked for on the guarantee page
The Alloy flame spreaders should not be washed in the dishwasher.
To clean the alloy flame spreaders, in clean warm water use a mild washing liquid soap with a soft cloth or sponge. Use a pin to push out any debris from the holes, and dry after washing. Make sure no other metal is or has been present in the water as this can cause electrolysis which will ruin the alloy flame spreaders and make them look scratched or blackened
See the above for cleaning and maintenance for the cast iron pan supports
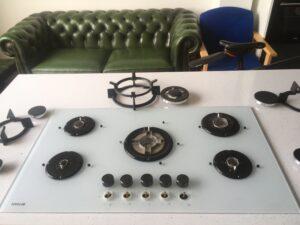
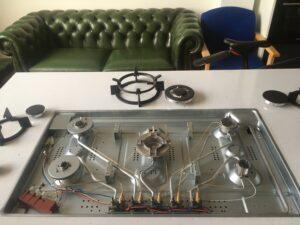
If you own one of our hob models such as the GH7051PB, all of the models with the GH7051P part of the code have interchangeable glass. This means if you want to change the glass for a fresh new look and colour you can do that. It is a few easy steps to replace the glass, and it does not require any specialist equipment or an engineer to do it. You won’t have to uninstall the hob and can leave it exactly where it is, just switch it off from the electrics until you have finished replacing the glass.
1. First, disassemble the parts as per the first photograph. Make sure to take the pan supports, burner caps, flame spreaders, and knobs off the top so you are left with just the glass and the drip trays.
2. Use a screwdriver to undo each of the screws on the drip trays and put them out of the way. Then carefully lift off your old glass. Once the glass has been removed, make sure to take the rubber seals off the burner holes if they didnt come off when you took the drip trays off. Dont forget the rubber seals where the knobs would sit on the glass too.
3. Attach the foam sealant to the bottom edges of the new glass. Put the new glass on the hob and reassemble all of the parts and you are finished.
From time to time, you may want to clean both sides of the glass on the oven door. While the oven is off and cold, open the oven door to be fully opened. Notice near the 2 brackets attaching the door to the main part of the oven, there is a safety catch on the bracket which must be pulled out away from the oven and it should lock into place. You can test if you have done this correctly by attempting gently to close the oven door and you should notice it will no longer close. This will prevent the oven door from slamming shut while you are performing care and maintenance. The internal glass on the oven door is held in by push-in clips, there are two at the bottom of the glass (closest to the oven) and three at the top (furthest away from the oven), you should be able to put fingers over the edges of the glass and pull carefully upwards away from the door itself. Sometimes this can be easier to do starting at the bottom of the glass first and then the top of the glass second. Once this internal piece of glass is removed, it will allow you to clean the inside of the glass on all pieces. If your oven door has the 3 layers of glass, make sure you remember to put the rubber corner holders back on the middle glass when you replace everything. Once you have cleaned all the glass, reassemble the glass layers, with the internal glass going in last. The internal glass should push back on the push-fit clips (might take a little force, be careful). Once this is all back together, close the locking safety clips on the bracket attaching the oven door to the oven, and you are all finished.
The maximum load capacity each of the burner is designed for, is shown below. This load consists of the cookware + the full contents of the cookware. For maximum cookware sizes please refer to the user manual. Exceeding cookware size, and load capacity can result in the glass shattering.
Wok burner
8.0kg
Rapid burner
6.2kg
Semi-rapid burner
4.7kg
Auxiliary burner
2.0kg